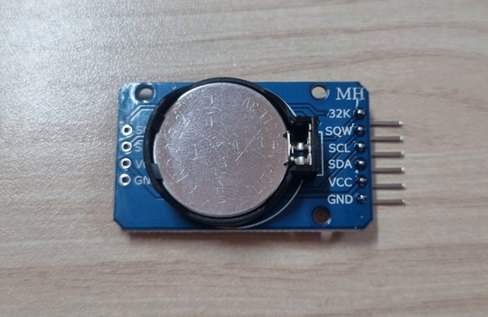
오늘은 아두이노와 관련된 DS3231 모듈로 시계모듈 RTC(Real Time Clock)입니다.
시간을 확인하거나 일정 시간에 인터럽트를 발생하기 위한
스케치 주소는 다음과 같습니다.
Welcome to Fritzing
Fritzing is an open-source hardware initiative that makes electronics accessible as a creative material for anyone. We offer a software tool, a community website and services in the spirit of Processing and Arduino, fostering a creative ecosystem that allo
fritzing.org
작성한 스케치입니다. 아래와 같이 아두이노와 결선합니다.

아두이노 메가는 다음과 같이 1번을 먼저 사용하고 부족하다면 2번을 사용하면 됩니다.

라이브러리는 다음과 같이 추가합니다.
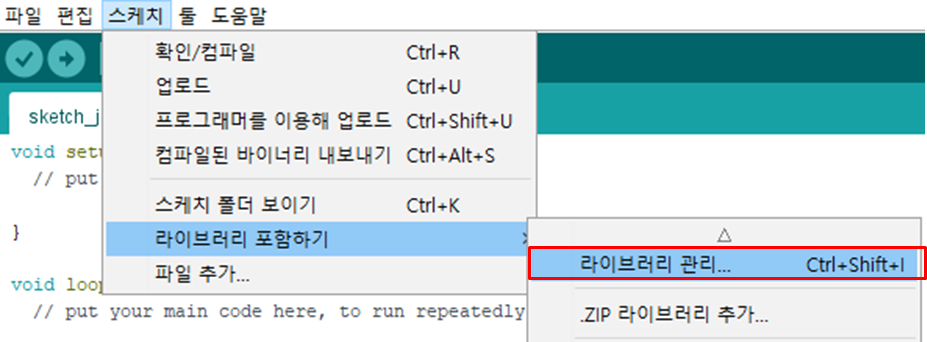
다음과 같이 RTClib를 검색하여 RTClib를 설치합니다.

설치가 안되거나 추가적으로 궁금한 점은 아래의 깃허브에서 찾아보시면 됩니다.
GitHub - garrysblog/DS3231-Alarm-With-Adafruit-RTClib-Library: Examples using the Adafruit RTClib library with the DS3231 RTC mo
Examples using the Adafruit RTClib library with the DS3231 RTC module to set and monitor the DS3231 alarm - GitHub - garrysblog/DS3231-Alarm-With-Adafruit-RTClib-Library: Examples using the Adafru...
github.com
간단하게 RTClib에서 제공하는 예제를 실행해 보겠습니다.
DS3231을 클릭

아래는 예제 코드입니다.
setup() 부분에 시리얼 통신 속도만 본인이 원하는 속도로 변경 후 실행하시면 됩니다.
// Date and time functions using a DS3231 RTC connected via I2C and Wire lib
#include "RTClib.h"

RTC_DS3231 rtc;

char daysOfTheWeek[7][12] = {"Sunday", "Monday", "Tuesday", "Wednesday", "Thursday", "Friday", "Saturday"};

void setup () {
  Serial.begin(115200); //통신속도 변경

#ifndef ESP8266
  while (!Serial); // wait for serial port to connect. Needed for native USB
#endif

  if (! rtc.begin()) {
    Serial.println("Couldn't find RTC");
    Serial.flush();
    while (1) delay(10);
  }

  if (rtc.lostPower()) {
    Serial.println("RTC lost power, let's set the time!");
    // When time needs to be set on a new device, or after a power loss, the
    // following line sets the RTC to the date & time this sketch was compiled
    rtc.adjust(DateTime(F(__DATE__), F(__TIME__)));
    // This line sets the RTC with an explicit date & time, for example to set
    // January 21, 2014 at 3am you would call:
    // rtc.adjust(DateTime(2014, 1, 21, 3, 0, 0));
  }

  // When time needs to be re-set on a previously configured device, the
  // following line sets the RTC to the date & time this sketch was compiled
  // rtc.adjust(DateTime(F(__DATE__), F(__TIME__)));
  // This line sets the RTC with an explicit date & time, for example to set
  // January 21, 2014 at 3am you would call:
  // rtc.adjust(DateTime(2014, 1, 21, 3, 0, 0));
}

void loop () {
    DateTime now = rtc.now();

    Serial.print(now.year(), DEC);
    Serial.print('/');
    Serial.print(now.month(), DEC);
    Serial.print('/');
    Serial.print(now.day(), DEC);
    Serial.print(" (");
    Serial.print(daysOfTheWeek[now.dayOfTheWeek()]);
    Serial.print(") ");
    Serial.print(now.hour(), DEC);
    Serial.print(':');
    Serial.print(now.minute(), DEC);
    Serial.print(':');
    Serial.print(now.second(), DEC);
    Serial.println();

    Serial.print(" since midnight 1/1/1970 = ");
    Serial.print(now.unixtime());
    Serial.print("s = ");
    Serial.print(now.unixtime() / 86400L);
    Serial.println("d");

    // calculate a date which is 7 days, 12 hours, 30 minutes, 6 seconds into the future
    DateTime future (now + TimeSpan(7,12,30,6));

    Serial.print(" now + 7d + 12h + 30m + 6s: ");
    Serial.print(future.year(), DEC);
    Serial.print('/');
    Serial.print(future.month(), DEC);
    Serial.print('/');
    Serial.print(future.day(), DEC);
    Serial.print(' ');
    Serial.print(future.hour(), DEC);
    Serial.print(':');
    Serial.print(future.minute(), DEC);
    Serial.print(':');
    Serial.print(future.second(), DEC);
    Serial.println();

    Serial.print("Temperature: ");
    Serial.print(rtc.getTemperature());
    Serial.println(" C");

    Serial.println();
    delay(3000);
}
다음과 같이 시간과 추가적으로 온도까지 불러올 수 있습니다.

자 그럼 예제를 살짝 변형해서 현재 시간만 추출을 해서 출력을 해보겠습니다.
    DateTime now = rtc.now();

    Serial.print(now.year(), DEC);
    Serial.print("년");
    Serial.print(now.month(), DEC);
    Serial.print("월");
    Serial.print(now.day(), DEC);
    Serial.print("일 ");
    Serial.print(now.hour(), DEC);
    Serial.print("시");
    Serial.print(now.minute(), DEC);
    Serial.print("분");
    Serial.print(now.second(), DEC);
    Serial.print("초");
    Serial.println();
날짜에 더하거나 뺄 수도 있습니다.
    DateTime future (now + TimeSpan(7,12,30,6)); //(일,시간,분,초)

    Serial.print("결과: ");
    Serial.print(future.year(), DEC);
    Serial.print("년");
    Serial.print(future.month(), DEC);
    Serial.print("월");
    Serial.print(future.day(), DEC);
    Serial.print("일 ");
    Serial.print(future.hour(), DEC);
    Serial.print("시");
    Serial.print(future.minute(), DEC);
    Serial.print("분");
    Serial.print(future.second(), DEC);
    Serial.print("초");
    Serial.println();
특정 시간에 알람이 발생하도록 하는 예제입니다.
#include <RTClib.h>
// #include <Wire.h>

RTC_DS3231 rtc;

// the pin that is connected to SQW
#define CLOCK_INTERRUPT_PIN 2

void setup() {
    Serial.begin(115200);

    // initializing the rtc
    if(!rtc.begin()) {
        Serial.println("Couldn't find RTC!");
        Serial.flush();
        while (1) delay(10);
    }

    if(rtc.lostPower()) {
        // this will adjust to the date and time at compilation
        rtc.adjust(DateTime(F(__DATE__), F(__TIME__)));
    }

    //we don't need the 32K Pin, so disable it
    rtc.disable32K();

    // Making it so, that the alarm will trigger an interrupt
    pinMode(CLOCK_INTERRUPT_PIN, INPUT_PULLUP);
    attachInterrupt(digitalPinToInterrupt(CLOCK_INTERRUPT_PIN), onAlarm, FALLING);

    // set alarm 1, 2 flag to false (so alarm 1, 2 didn't happen so far)
    // if not done, this easily leads to problems, as both register aren't reset on reboot/recompile
    rtc.clearAlarm(1);
    rtc.clearAlarm(2);

    // stop oscillating signals at SQW Pin
    // otherwise setAlarm1 will fail
    rtc.writeSqwPinMode(DS3231_OFF);

    // turn off alarm 2 (in case it isn't off already)
    // again, this isn't done at reboot, so a previously set alarm could easily go overlooked
    rtc.disableAlarm(2);

    // schedule an alarm 10 seconds in the future
    if(!rtc.setAlarm1(
            rtc.now() + TimeSpan(10),
            DS3231_A1_Second // this mode triggers the alarm when the seconds match. See Doxygen for other options
    )) {
        Serial.println("Error, alarm wasn't set!");
    }else {
        Serial.println("Alarm will happen in 10 seconds!");
    }
}

void loop() {
    // print current time
    char date[10] = "hh:mm:ss";
    rtc.now().toString(date);
    Serial.print(date);

    // the stored alarm value + mode
    DateTime alarm1 = rtc.getAlarm1();
    Ds3231Alarm1Mode alarm1mode = rtc.getAlarm1Mode();
    char alarm1Date[12] = "DD hh:mm:ss";
    alarm1.toString(alarm1Date);
    Serial.print(" [Alarm1: ");
    Serial.print(alarm1Date);
    Serial.print(", Mode: ");
    switch (alarm1mode) {
      case DS3231_A1_PerSecond: Serial.print("PerSecond"); break;
      case DS3231_A1_Second: Serial.print("Second"); break;
      case DS3231_A1_Minute: Serial.print("Minute"); break;
      case DS3231_A1_Hour: Serial.print("Hour"); break;
      case DS3231_A1_Date: Serial.print("Date"); break;
      case DS3231_A1_Day: Serial.print("Day"); break;
    }

    // the value at SQW-Pin (because of pullup 1 means no alarm)
    Serial.print("] SQW: ");
    Serial.print(digitalRead(CLOCK_INTERRUPT_PIN));

    // whether a alarm fired
    Serial.print(" Fired: ");
    Serial.print(rtc.alarmFired(1));

    // Serial.print(" Alarm2: ");
    // Serial.println(rtc.alarmFired(2));
    // control register values (see https://datasheets.maximintegrated.com/en/ds/DS3231.pdf page 13)
    // Serial.print(" Control: 0b");
    // Serial.println(read_i2c_register(DS3231_ADDRESS, DS3231_CONTROL), BIN);

    // resetting SQW and alarm 1 flag
    // using setAlarm1, the next alarm could now be configurated
    if (rtc.alarmFired(1)) {
        rtc.clearAlarm(1);
        Serial.print(" - Alarm cleared");
    }
    Serial.println();

    delay(2000);
}

void onAlarm() {
    Serial.println("Alarm occured!");
}
실행을 하면 10초 이후 알람이 발생합니다.

현재시간 + 10초 알람 설정은 위에 예제에서 다음 부분입니다.
    // schedule an alarm 10 seconds in the future
    if(!rtc.setAlarm1(
            rtc.now() + TimeSpan(10),
            DS3231_A1_Second // this mode triggers the alarm when the seconds match. See Doxygen for other options
    )) {
        Serial.println("Error, alarm wasn't set!");
    }else {
        Serial.println("Alarm will happen in 10 seconds!");
    }
초 단위뿐만 아니라 특정 시간대 알림도 다음과 같이 가능합니다.
// Time relative to now
//rtc.now() + TimeSpan(10), DS3231_A1_Second         // 초 단위만 사용할때
rtc.now() + TimeSpan(0, 0, 1, 0), DS3231_A1_Minute   // 1분
//rtc.now() + TimeSpan(0, 0, 2, 10), DS3231_A1_Minute// 2분 10초
//rtc.now() + TimeSpan(0, 1, 1, 0), DS3231_A1_Hour   // 1시간 1분

// At explicit times
//DateTime(0, 0, 0, 0, 0, 0), DS3231_A1_Second  // 0으로 설정 시 매 분 마다
//DateTime(0, 0, 0, 0, 0, 0), DS3231_A1_Minute  // 0으로 설정 시 매 시간 마다
//DateTime(0, 0, 0, 0, 1, 10), DS3231_A1_Minute // 1분 10초가 지난 시간
//DateTime(0, 0, 0, 10, 0, 0), DS3231_A1_Hour   // 매일 10시
//DateTime(0, 0, 0, 10, 18, 0), DS3231_A1_Hour  // 매일 10시 18분
이상으로 아두이노 시계모듈 RTC DS3231 모듈에 대해서 간단히 알아보았습니다.
감사합니다.
'프로그래밍 > 아두이노[Arduino]&라즈베리파이[Raspberry Pi]' 카테고리의 다른 글
| 아두이노 I2C 2004 LCD 연결 방법 및 간단 사용(4줄 LCD) (0) | 2023.03.15 |
|---|---|
| 아두이노 메가 전체 핀맵 핀정보 정리[Pin-table] (0) | 2023.01.05 |
| 아두이노 16진수 변수 합치기[low byte, high byte] (0) | 2022.12.30 |
| [Arduino]아두이노 char 배열 여러개 사용(포인터) (0) | 2022.12.30 |
| [ArduinoJson]아두이노에서 Json 사용법 정리 (0) | 2022.12.30 |


